Your mantel or table clock
Setting up, winding and regulating – a practical guide
“At a glance” covers the essentials. The chapters explain the details; troubleshooting is at the end.
At a glance
1. Which clock do you have?
Identify the type, then read the relevant section.
This booklet covers mechanical mantel and table clocks. Chapter 8 deals with particular types, and Chapter 9 with French mantel clocks.
- Pendulum mantel or table clock: Mantel, table and Black Forest table clocks have a short pendulum behind the rear door.
- English bracket clock: It has a carrying handle. Many have a chain and fusee inside the movement; some have a pull cord for repeating the strike.
- French mantel clock: A round movement in a bronze, marble or cast-zinc case.
- Balance-controlled table clock: A small wheel with a hairspring oscillates instead of a pendulum.
- Carriage clock: It has a handle, glazed case panels and a double-ended key.
- Anniversary clock: A disc or ball pendulum rotates slowly beneath a glass dome.
- Atmos: This Jaeger-LeCoultre clock winds itself from room-temperature changes.
Space for your notes:
- Winding (day, direction): ______________________
- Regulation: ______________________
- Other details: ______________________
2. Transport and the right position
Remove the dome, secure the pendulum and carry with both hands.
Mantel and table clocks are moved frequently. This can kink the suspension spring, the thin spring strip supporting the pendulum. Prepare the clock before every move, even within your home.
- Lift a glass dome straight upwards with both hands. Never carry the clock with its dome fitted.
- Secure the pendulum in its transport hook or clamp. Alternatively, unhook it and carry it with protective padding.
- Place foam between the hammers and chime rods or gong. Pad any bell.
- Lock anniversary and Atmos clocks before moving them, even a few centimetres (Chapter 8).
- Carry the clock upright with both hands beneath its base. A bracket clock’s handle is often only decorative.
- Carry a carriage clock by its handle, never by the glass, and use its carrying case for travel.
The right position
Choose a suitable position, preferably in a dry room away from direct sunlight and extremes of temperature.
- The supporting surface must be firm and level from front to back as well. Otherwise the pendulum may rub.
- Leave the rear door and sound openings clear.
- Do not place the clock above a lit fireplace or beside a radiator. Heat can split the wood and deteriorate the oil.
- Avoid vibration, draughts and air conditioning. Cellars, bathrooms and conservatories are too damp.
3. Setting up with a pendulum
Hold the pendulum by its rod, never by the suspension spring.
This applies to mantel, table and bracket clocks. For French mantel clocks, also read Chapter 9; for anniversary and Atmos clocks, read Chapter 8.
Remove transport restraints
- Open the rear door and remove all restraints from the hammers, chime rods, gong, bell and crutch. The crutch is the small fork beneath the movement that drives the pendulum.
- Cut rubber bands. Slide restraints marked with a red arrow, as used by Hermle, fully in the arrow’s direction rather than pulling them off.
- Do not bend any hammers or loosen screws on the chime-rod mounting block.
Hang the pendulum
Carefully hook the pendulum into its intended suspension from behind, checking that it can swing freely. Hold its rod below the hook, never the suspension spring.
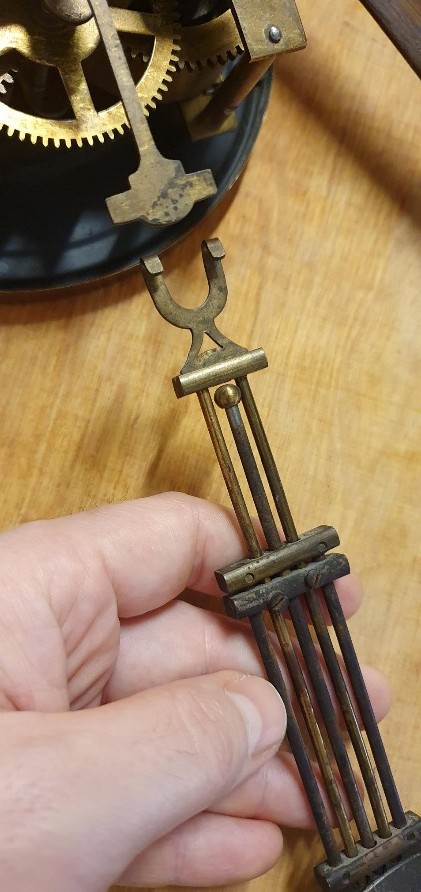
Do not press on the suspension or bend the crutch or suspension spring. On Hermle clocks, the polished side of the bob faces forwards.
Check that the pendulum engages with the crutch. On many modern movements a short pendulum leader passes through it; on others, the pendulum rod itself does. If it sits beside the crutch, the clock will stop. This is one of the most common reasons a newly repaired clock will not run.
Then wind the clock (Chapter 4), set the time (Chapter 5) and start the pendulum (Chapter 6).
↑ Back to contents4. Winding
Wind all trains on the same day, without force.
Wind every train fully on the same day. If the striking train runs down before the timekeeping train, the clock may subsequently strike incorrectly or not at all.
How to wind:
- Hold the clock steady with your free hand.
- Push the correct key fully onto the winding square. An oversized key rounds it off.
- Wind in short, steady movements until it stops. Do not force it further at the end.
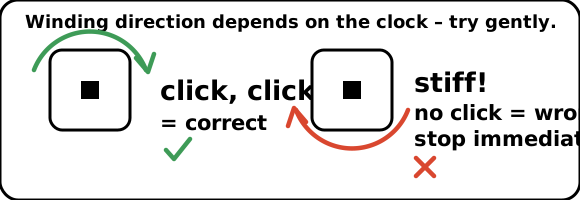
- After each movement, hold the key until the click has engaged. Never let it snap backwards.
Do not use force, pliers or levers. Winding directions can differ between trains. Try gently. The click sounds clearly in the winding direction. In the opposite direction it stays silent and the key stops after a short movement. Immediately turn the other way.
If your clock has a chain and fusee, the winding stop arrives suddenly. Stop immediately (Chapter 8). On a French mantel clock, do not press on the key or dial (Chapter 9).
When should you wind it?
- Eight-day movement: Wind once a week on a fixed day, even if still running. This leaves one day in reserve. This usually also applies to carriage clocks.
- Fourteen-day movement, as found in many French mantel clocks: wind every two weeks.
- Anniversary clock: Wind once a year. An Atmos winds itself.
- Carriage-clock alarm: Wind before each use.
- Unknown running duration: Wind weekly; this does no harm to a movement with a longer duration. If it stops after a little over a day, it has a one-day movement. Wind it at the same time each day.
5. Setting the time
Move the minute hand forwards only and allow every strike to finish.
- Hold the minute hand close to its centre. It bends easily at the tip.
- Turn it slowly clockwise until the required time is reached.
- At every quarter, half and full hour, allow the striking or chime melody to finish completely before continuing.
The hour hand can be turned independently. If the hour struck does not match the display, move it by the shorter route to the hour just struck, immediately after striking has finished. Never do this just before the full or half hour. If it is stiff, call us.
Daylight saving time
- March: Advance the time by one hour, allowing every strike to finish. Lock an Atmos before setting, then release it afterwards.
- October: Gently stop the pendulum at the end of its swing and restart it after exactly one hour. Stop anniversary and Atmos clocks for an hour too, using the locking lever on the Atmos.
- Balance-controlled clock: Modern movements, such as Hermle movements, may be set back by one hour.
- Carriage clock: Without a calendar, advance by eleven hours. If it has a calendar, call us.
Silencing the strike and night-time shut-off
Many clocks have a strike/silent lever; some have a night-time shut-off from about 10 pm to 7 am.
If the clock strikes at night and is silent during the day, its night-time shut-off is twelve hours out. Advance the hands by twelve hours, allowing every strike to finish.
After the clock has stopped
- Wind all trains.
- If the clock is no more than six hours fast, leave the pendulum stopped until the actual time catches up. Otherwise advance the hands, allowing every strike to finish.
- Start the pendulum.
- If the next hour strike is wrong, move the hour hand to the hour struck. For count-wheel striking, see Chapter 9.
- Check the night-time shut-off on the first evening.
6. Starting the clock and achieving an even beat
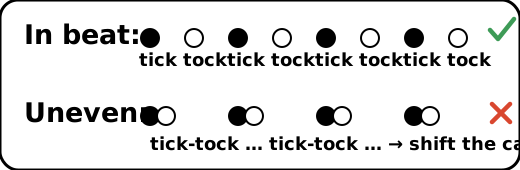
Tick and tock should be evenly spaced: listen carefully.
Move the pendulum to one side and release it without pushing. A pushed pendulum can wobble.
Is the beat uneven?
A clock that is out of beat will eventually stop.
To put the clock in beat:
- Check that the pendulum swings freely and engages with the crutch.
- Place thin card beneath either side of the case. A few millimetres is almost always enough.
- Listen with the pendulum swinging through a small arc. If the beat becomes more even, continue; otherwise try the other side.
- Once the ticking is even, do not move the clock again.
Only on newer movements with automatic beat adjustment, such as some Hermle, Kieninger or Urgos movements, is one wide pendulum swing often sufficient. Do not allow the pendulum to hit anything.
7. Regulating
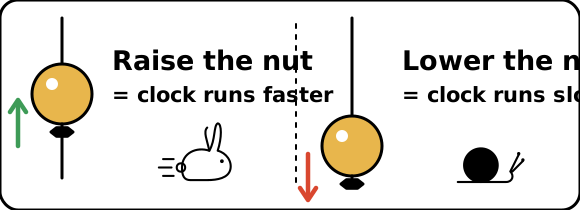
Raise the nut: faster. Lower it: slower.
If the clock gains or loses over a week, adjust the regulating nut beneath the pendulum bob, the round disc near the bottom of the pendulum. Turning the front edge of the nut to the right raises the bob and makes the clock run faster. To the left makes it run slower.
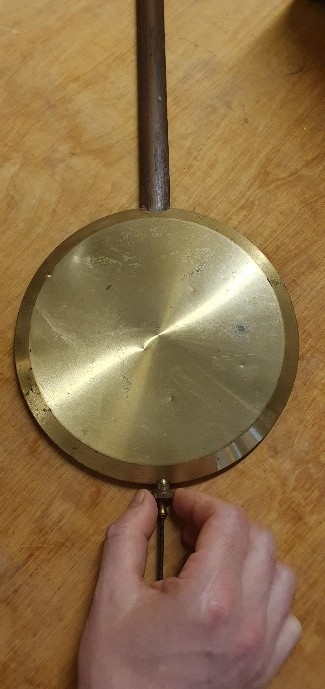
The effect of one turn depends on the pendulum length, stamped on the back of modern movements. Otherwise measure from the suspension to the underside of the nut and use the closest figure.
With a usual thread, one full turn changes the rate by approximately:
- 11 cm pendulum (small mantel clock): 3 to 4 minutes per day, depending on the thread
- 25 cm pendulum: about 1¾ minutes per day
For example, your mantel clock with a 25 cm pendulum gains two minutes in a week. That is 120 seconds divided by seven days, or just over 17 seconds a day. One turn changes the rate by about 1¾ minutes, or 105 seconds. Turn the front edge of the nut to the left by only about one-sixth of a turn.
Step by step
- Allow the clock to settle for two to three days after setting it up.
- Compare it with an accurate time source, such as a smartphone, for a week. Divide the discrepancy by the number of days.
- Stop the pendulum and hold its rod above the bob so that the suspension spring cannot twist.
- Turn the nut by the calculated amount, preferably a little less rather than too much.
- If you have lowered the nut, gently slide the bob down until it rests on the nut again.
- Restart the pendulum. After another week, adjust again if necessary.
According to Hermle, mechanical pendulum clocks usually vary by two to five minutes per week; antique clocks vary more. Regulation is worthwhile only if the clock consistently gains or consistently loses from week to week.
Two nuts
With two nuts, the upper one supports the bob. The lower one is a locknut to prevent movement.
- Turn the lower nut down a little, at least far enough to accommodate any intended lowering of the bob.
- Regulate with the upper nut.
- Hold the upper nut still and tighten the lower one against it. Otherwise the regulation can alter by itself.
8. Particular types of clock
Find your type here for its specific instructions.
Mantel, table and Black Forest table clocks
Chapters 3 to 7 apply. Some Black Forest table clocks from about 1900 to 1970 have count-wheel striking. If in doubt, set them following Chapter 9 and synchronise with the hour hand (Method 1).
English bracket clock
Many bracket clocks have a chain and fusee: a conical component with a fine chain. The winding stop arrives suddenly, without increasing resistance at the key beforehand.
- On early bracket clocks with a verge escapement, the pendulum is attached to the movement. Only release it from its transport hook.
- Pull the repeating cord slowly all the way to its stop, then release it. Otherwise the clock gives only part of the strike sequence.
- Regulate at the bob or the small “Slow/Fast” dial, always in small steps.
Balance-controlled table clock
Adjust the regulating screw: on Hermle movements, clockwise makes the clock slower and anticlockwise faster. Turn only about one-sixteenth of a revolution at a time. Move a regulator lever by only a tiny amount, without touching the hairspring. If it is inside the closed case, leave this to us.
Carriage clock
- Wind each square with the end of the double-ended key that fits closely.
- Set the time with the correct key end on the hand-setting square, or with the minute hand, always forwards and pausing for every strike.
- Press the repeating button fully. A partial press produces only part of the strike sequence.
- Do not set the calendar during the hours around midnight, when its advancing mechanism is engaged.
Anniversary clock (400-day clock)
The pendulum hangs from an extremely thin suspension-spring strip.
- Place the clock on a firm, vibration-free surface.
- Release the pendulum’s transport lock, lever or clamp.
- Adjust the levelling screws in the base until the pendulum point hangs centrally above the guide cup without touching it.
- Turn the pendulum by hand through half to one full revolution, then release it without pushing.
- After each tick, the pendulum continues to rotate a little further, equally in both directions. If this is uneven, call us.
- Replace the glass dome and do not move the clock again.
- Wind once a year in the arrow’s direction, anticlockwise on Schatz and Kundo clocks. Hold the key firmly after every half-turn.
- Wait at least 48 hours before regulating with the disc on top of the pendulum. Moving the regulating weights inwards makes the clock faster; moving them outwards makes it slower. On Schatz clocks, one numbered division changes the rate by about half a minute per day.
- If it stops after twenty minutes to a few hours, transport has usually put it out of beat. We can adjust this.
Atmos
Place the Atmos, with its pendulum locked, on a completely stable surface away from sunlight, heating, air conditioning, televisions and computers.
- Use the front adjustable feet and the spirit level in the base to level it.
- Set the time forwards only, using the minute hand.
- Slide the locking lever beneath the dial to the left.
- Wait at least a month before regulating. One graduation on the regulator changes the rate by about ten seconds per day. Moving towards F or A makes the clock run faster.
- If an Atmos stops, insufficient temperature variation is often the reason. Briefly ventilate or heat the room instead of moving the clock. If the small winding chain still does not move, bring the clock to us.
9. Special case: French mantel clock with count-wheel striking
Never move backwards; allow every strike to finish completely.
Many French mantel clocks have a count wheel: a disc with unequally spaced notches, usually at the back of the movement. It counts the strikes in sequence independently of the hour hand. Moving the hands too quickly or backwards, or allowing the striking train to run down, can leave it striking incorrectly until resynchronised.
The three rules
- Set the time slowly and forwards with the minute hand only. At every full and half hour, wait until striking has finished completely.
- Never turn backwards.
- Always wind the timekeeping and striking trains together. If the striking train runs down first, the count wheel stops advancing with the hands.
Setting up a French mantel clock
- Lift the clock with both hands beneath the base, never by figures or columns. Cast zinc breaks easily.
- Level it from side to side and front to back so that the bob cannot rub against anything.
- Open the rear door, remove all restraints and hang the pendulum. Its hook engages with the lower block of the extremely thin suspension spring, and its rod passes through the crutch slot. Do not kink the spring.
- Wind both trains while holding the case steady. Do not press on the key or dial, or the round movement may rotate within the case.
- Move the pendulum slightly to one side and listen for an even tick-tock. If it is uneven, place thin card beneath one side of the base. If only a visible tilt helps, bring the clock to us.
- Set the time following the three rules. If the next hour strike is wrong, synchronise it as described below.
Regulating at the A/R square
Adjust the small square in the dial above XII. It is usually marked A for avance (faster) and R for retard (slower).
- Use a closely fitting socket key and turn towards the required letter without pressing on the dial. One full turn changes the rate by about one minute per day.
- If there are no letters, try a quarter turn and compare the time over a week. If the variation becomes greater, turn the other way. After changing direction, backlash in the gearing initially produces little effect.
- If you do not have the key, feel an end stop or find that the square turns freely, call us.
French mantel clock with silk-thread suspension
Older French mantel clocks with silk-thread suspension change their rate with humidity. This is normal. Regulate at the thread arbor, using a knob at the back or a square at the front. Winding the thread raises the pendulum and makes the clock faster; unwinding it makes it slower. Make small adjustments and observe for 24 hours after each.
Synchronising the strike and hands
There are two methods: from the front with the hour hand, or from behind with the strike-release lever.
Method 1: using the hour hand
- Wait for the next hour strike and count it.
- Immediately afterwards, move the hour hand alone to the hour struck. Hold it near the centre and turn without pressure. If the minute hand moves too or the hour hand is stiff, stop immediately. Use Method 2 or call us.
- The strike and hands now agree. If the displayed time is later than the actual time, stop the pendulum until the actual time catches up.
- If it shows an earlier time or is more than six hours fast, advance the minute hand, allowing every strike to finish.
For example, it is four o’clock, the hour hand points to four, but the clock strikes seven. Move the hour hand to seven. The clock is now three hours fast. Stop the pendulum and restart it at seven o’clock.
Method 2: using the strike-release lever
If you wish and feel confident doing so, release the strike manually at the back of the movement. A small lever rests on the edge of the count wheel. Lift it briefly to make the clock strike the next full or half hour. If you cannot find it, use Method 1.
- Set the hands to the correct time following the three rules. It is best to do this between five and twenty-five minutes past the hour.
- Open the rear door, lift the lever briefly and release it immediately.
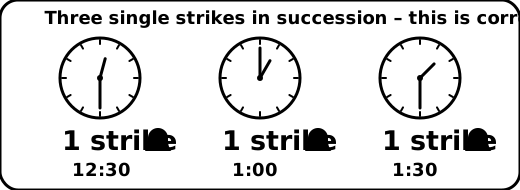
- Let the clock finish striking and count the strikes. A single strike represents a half hour, except at one o’clock, when it represents the hour.
- Repeat until the clock strikes the hour shown by the hour hand. If it points to one, release the strike exactly twice more after the twelve strikes: first the single strike for 12:30, then the one for 1:00.
- If the minute hand is between half past and the next full hour, release once more for the single half-hour strike.
- Wind both trains again afterwards: every strike consumes energy.
For example, the clock struck seven but the hour hand points to four. There are nine hours between them, each with a half-hour and a full-hour strike. Release the strike eighteen times. More than twenty-three releases are never needed.
10. Care and maintenance
Never oil it yourself; arrange an overhaul about every ten years.
- Dust the case with a soft, dry cloth. Apply glass cleaner to the cloth. Keep furniture spray and polish away from the movement.
- Dust gilt bronze dry only, without metal polish.
- Do not polish lacquered brass parts such as the pendulum bob, and avoid touching them with bare fingers.
- Never oil the movement yourself. Household oils, penetrating oils and sprays leave gummy deposits in it.
The overhaul
Movement oil deteriorates even when the clock runs well. Have the movement overhauled about every ten years. We dismantle it, clean it and lubricate it afresh. Do not wait for the clock to stop. Dried oil traps dust and wears pivots and bearings. Simply adding more oil is not an overhaul.
↑ Back to contentsTroubleshooting
The clock does not tick, ticks unevenly or stops soon after starting.
Possible cause: A restraint is still fitted, or the pendulum is not engaged with the crutch or is rubbing.
What you can do: Remove the restraint, rehang the pendulum and put the clock in beat (Chapter 6).
The clock stops after winding.
Possible cause: The clock has shifted, or a French mantel clock’s round movement has rotated in its case.
What you can do: Hold the clock steady when winding and put it back in beat. Thin card beneath one foot can temporarily help a French mantel clock. We can align its movement properly.
The clock always stops with the hands in the same position.
Possible cause: The hands touch each other or the glass, or a striking train has run down.
What you can do: Wind all trains and check the hands. Otherwise call us.
The pendulum wobbles or rubs.
Possible cause: The suspension spring is kinked, or the clock leans forwards or backwards.
What you can do: Rehang the pendulum and align the case. We can replace a kinked suspension spring.
The hands race and the movement runs down rapidly.
Possible cause: The pendulum is missing or is not engaged with the crutch.
What you can do: Fit the pendulum correctly. If the movement continues to run down, bring the clock to us without further intervention.
The key does not click, pulls backwards or slips.
Possible cause: You are turning against the ratchet, the key does not fit, or the click, chain or mainspring is faulty.
What you can do: Never force it further. Check the winding direction and the key. Let a key that pulls backwards turn back slowly through your fingers (Chapter 4). Then bring the clock to us.
The clock does not run until its next winding day.
Possible cause: It was not fully wound, or the mainspring has gummy deposits.
What you can do: Wind fully. If the problem remains, the clock needs workshop attention.
The clock strikes a different hour from the one shown by the hour hand.
Possible cause: The hour hand has moved, or the count wheel has advanced out of step.
What you can do: Immediately after striking, move the hour hand to the hour struck. For count-wheel striking, see Chapter 9.
The clock strikes the hour at the half hour.
Possible cause: The count wheel is one step out; on other clocks, the minute hand is displaced.
What you can do: On a count-wheel clock, release the strike once manually and resynchronise it (Chapter 9). Otherwise call us.
The clock is silent or strikes only at night.
Possible cause: The striking train has run down, the lever is set to silent or partly engaged, or the night-time shut-off is out of step.
What you can do: Wind the clock and engage the lever fully. On a count-wheel clock, then synchronise strike and time (Chapter 9). Adjust the night-time shut-off as described in Chapter 5.
The sound is dull or distorted.
Possible cause: A restraint is still fitted, the clock is touching something, or a hammer is resting against a rod or gong.
What you can do: Remove all restraints and give the clock adequate clearance. Leave hammer and chime-rod adjustment to us.
The clock strikes continuously or gives one strike too many.
Possible cause: A striking lever is sticking.
What you can do: Do not bend anything; call us.
The clock gains or loses time.
Possible cause: It has not yet been regulated, the season has changed, or the bob is not following the nut.
What you can do: Compare the time over a week and regulate as described in Chapter 7. If the nut cannot turn any further, we will check the pendulum.